The main reason why you landed up on this blog must be the BSoD (Blue Screen of Death), which is an annoying blue screen that shows a specific stop. It appears when there is a Kernel Security Check Failure due to various reasons.
Many users experience this blue screen after upgrading to Windows 10, and it can occur quite frequently. There can be many different reasons behind the occurrence of BSoD, like memory issues, virus infections, and more. However, the most common reasons are the ones below:
- Corrupted Windows system files
- Memory problems and outdated drivers
- Viruses or inadequate security programs
- A corrupted or damaged hard disk
Situations that Can Trigger BSoD
- After sleep
Kernel Security Check Failure may occur after waking your PC from sleep.
- After a RAM upgrade
This blue screen can occur after inserting a new RAM card.
- While playing games
You may encounter this error while playing games.
- While using specific apps and programs
It is also possible that particular apps and programs may trigger kernel security check failure to occur frequently.
10 Ways to Fix Kernel Security Check Errors in 2021
1. Check memory problems
To check memory problems, Windows has a built-in memory diagnostics tool that identifies memory problems and makes the whole process a cakewalk. Follow the steps mentioned below to run the memory diagnostics tool in Windows 10:
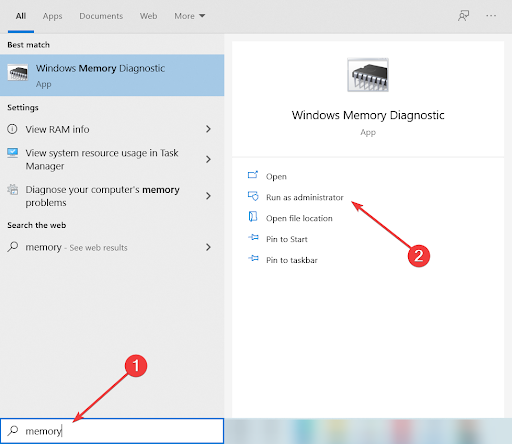
Step-1: Launch the memory diagnostics tool
Type memory or mdsched in the Cortana Search box. Open the Windows Memory Diagnostic tool.
Step-2: Check for problems with the tool
Choose from the following two options that will be displayed on your screen:
- Restart now and check for problems.
- Check for problems the next time I start my computer.
On discovering a memory problem, you have to replace the current memory card with a new one.
2. The legacy advanced boot menu
Another way to resolve the Kernel Security Check Failure is to enable the legacy advanced boot menu. Follow the steps mentioned below to achieve the same:
- Restart your computer. Insert a Windows 10 bootable media into the optical media drive
- Right after clicking on Next, click on Repair your computer, then select troubleshoot
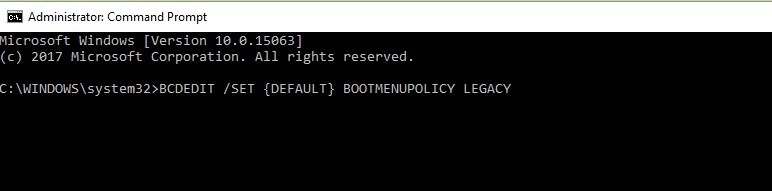
- Now click on advanced options, then hit Command prompt option
- A new Command Prompt window will open and type ‘C.’ Run the following command and hit enter to enable the legacy advanced boot menu.
BCDEDIT /SET {DEFAULT} BOOTMENUPOLICY LEGACY
 3. Use system file checker and memory diagnostic
To use this method, follow the steps mentioned below:
- Go to Settings, select Advanced Startup and open See advanced repair options menu
- Under the Advanced Options icon, click or tap on Startup Settings
- Left-click the Restart button. After this, your operating system will boot in the minimum system requirements
- Left-click on the Search feature and type cmd
- Click on Run as administrator. The command prompt will open with full privileges
 Run sfc /scannow command and hit Enter.
- Wait until the scanning process completes and exit the window.
- Again, go to the Search feature and type memory, and select Run as administrator under Windows Memory Diagnostic.
 After rebooting, the OS will automatically analyze RAM and show all the possible reasons for the Blue Screen of Death error.
4. Install, uninstall, or update drivers
One of the most common reasons for Kernel Security Check Failure in Windows 10 is the newly installed drivers, outdated drivers, or incompatible drivers. Therefore, if you’ve installed a new hardware driver or upgraded to Windows 10, then you can uninstall or reinstall a driver. You need to run the Windows built-in Driver Verifier Manager to check for corrupt drivers automatically. After that, follow the steps mentioned below to uninstall, reinstall, or update them.
Step-1: Launch Device Manager
- Right-click on the Windows 10 start menu and open Device Manager
- You can search for “Device Manager” in the Windows search box.
Step-2: Uninstall, reinstall or update the drive
Follow the below-mentioned steps one-by-one to uninstall, reinstall or update a driver:
- Search for the device driver that may be working incorrectly.
- To select the ‘Update driver’ or ‘Uninstall device’ option, right-click on it.
5. Run system restore
System restore comes in handy for fixing system issues. It will help you to bring your computer to an earlier state. You have to choose a restore point to revert your computer to a previous state, which does not have the kernel security check failure.
6. Use safe mode
If you don’t want to reboot your PC for some reason, you can try booting it in Safe Mode that will help you identify the apps or software that are causing this problem (if any).
If there’s no problem discovered in safe mode, it means that an app or software indeed triggers the problem. You can further use programs one by one to identify the culprit, and after finding it, you can uninstall the problematic software.
7. Check memory slot
Before hopping into time-taking and hectic techniques, make sure to check the memory slot first. Ensure that it is correctly placed into the socket and is functioning correctly. Try and replace the memory slot or change the space in which it is plugged into the motherboard. Reboot your PC to see if they stop code Kernel Security Check Failure persists.
8. Update your OS
Since Microsoft continually rolls out new updates to improve the system’s stability and fix various issues, it is recommended to make sure that your machine has the latest Windows OS updates installed in it.
Hop on to the Windows Update section by merely typing “update” in the search box. Then go to Windows Update and check for updates and install the available updates.
9. Check your disk for errors
One of the best ways is to run a disk check using Command Prompt on Windows 10. Follow the steps mentioned below to achieve the same:
- Run command prompt as administrator and run chkdsk C: /f command.
- The chkdsk D: /f command will help you detect and repair logical issues affecting your drive.
- To repair physical issues, run the /r parameter.
10. Do a clean install on Windows 10
If you could not fix kernel security check failure by any of the methods mentioned above, you should perform a clean install of Windows 10. But before making the clean install, ensure to follow the steps to backup your system disk in advance. This will prevent all your data from getting lost.
Backup system disk
- Select the disk and copy the content and click Next. A window will pop-up; hit yes to continue.
- Review and click Next to continue.
- Now select the target disk to copy the content.
- Click on Apply to allow the pending operations.
Install Windows 10
- The first step is to create a Windows 10 installation media USB drive.
- Now restart and boot from the USB drive.
- At last, Install Windows 10 by selecting the language preferences and clicking on ‘Install Now’. You can either enter the license key or click ‘I don’t have a product key’ to skip it and enter it later.
- Finally, accept the license terms and click Next.
Conclusion
The “Kernel Security Check Failure” error and the BSoD (Blue Screen of Death) are quite frankly some of the most annoying errors you could encounter on Windows 10. However, as mentioned throughout the blog, there are plenty of solutions to eliminate the same.